The County requires disturbed areas to be seeded for stabilization 7 days after the end of grading activities. Progress is slow on my end (for various reasons) getting financing and permits in place, so I had to do something. Knowing that I'm going to have to maintain a big giant area of grass and knowing that trying to mow bumpy lawn is a PITA, I rented a bulldozer and smoothed out the site as best I could. This is the Case 650K I used.
After smoothing out the grade as much as possible, it was time to seed. Laura and I used two broadcast spreaders to spread 450 lbs. of fescue grass seed. I got a pretty good deal from John Speelman at Poolesville Hardware. Here is Laura spreading grass seed with a broadcast spreader. Laura is the little pink blurb on the right. It only took a few hours.
Once the grass seed was down, the County requires straw on top. I had absolutely no idea how much area straw would cover, so google it I did. I came across estimates of 500 sq ft of coverage for a bale if blown on, 300 sq ft if shaken on by hand. That came out to 175 bales needed for 2 acres of site.
Well, those estimates were WAY off. We covered the site using an Agri Metal blower in the back of the truck using only about 60 bales. And it was not weak coverage. Maybe the bales we get are more dense than what the internet gets. Oh well, live and learn.
I'll post pics when the grass starts to grow.
Thursday, October 19, 2017
Wednesday, August 2, 2017
Poor man's surveying
It's been pretty interesting...with this engineer's compass and a 100' tape measure, I've been able to pretty accurately locate property corners, lines, and building corners. And, yes, I'm adjusting for magnetic declination.
Saturday, July 22, 2017
Shop building
A friend was asking what the new shop is going to look like. Here is the cover page from the plans. For reference, the height of the walls is 16' (that's FEET), allowing for a loft to be built in the middle. The plan is to put the chevalet (possibly multiple) up in the loft area with some big tables and such. I'll probably end up storing the veneer up there, too. The big door in the end wall is a 10' x 10' door. Ought to be big enough for a forklift to run stuff in and out if necessary. The siding on the building will be fiber cement, plank on the bottom half and shingle on the top half. The building is about 60' x 40'. I hope it's enough space.
Tree protection fence, silt fence and site inspections
In the past couple weeks, the tree protection fence and silt fence have been put up, including in the areas where we are running the pressure sewer line. The County and Town have passed the inspections, allowing us to start clearing trees.
The pressure sewer line is part of our subdivision requirements...we bought 14+ acres originally, subdivided into 4 lots (three 2 acre lots and one 8 acre lot...guess where we are building). The three 2 acre lots are for sale if anybody is interested. We had to run a sewer line to all the lots as a subdivision requirement. We opted for a pressure sewer since a gravity sewer would have required a ridiculous amount of digging and road repair. Geometry of the land would have necessitated going to a manhole far to the south in order to get the drop required.
Here is a picture of our driveway entrance earlier this week. That's the directional drill rig on the left, drilling south for the pressure sewer line.
Here is a picture of our driveway entrance as of yesterday. The drill rig is now on the right, drilling north to connect to the sewer line already installed up there. The excavator in the middle is going to start pulling stumps on Monday. The orange fencing is tree protection fence. It's supposed to keep machinery and work away from tree root zones on the other side.
And just for comparison, here is what the entrance looked like prior to our work.
The pressure sewer line is part of our subdivision requirements...we bought 14+ acres originally, subdivided into 4 lots (three 2 acre lots and one 8 acre lot...guess where we are building). The three 2 acre lots are for sale if anybody is interested. We had to run a sewer line to all the lots as a subdivision requirement. We opted for a pressure sewer since a gravity sewer would have required a ridiculous amount of digging and road repair. Geometry of the land would have necessitated going to a manhole far to the south in order to get the drop required.
Here is a picture of our driveway entrance as of yesterday. The drill rig is now on the right, drilling north to connect to the sewer line already installed up there. The excavator in the middle is going to start pulling stumps on Monday. The orange fencing is tree protection fence. It's supposed to keep machinery and work away from tree root zones on the other side.
And just for comparison, here is what the entrance looked like prior to our work.
Monday, July 3, 2017
Construction Entrance
A lot has happened in 5 days. Here is how the entrance looked on June 28:
Here is how it looks today:
The stabilized construction entrance is in (thanks, Bartley!), and it's about ready for silt fence. Still needs some root pruning. God forbid we harm trees that WE own.
Here is how it looks today:
The stabilized construction entrance is in (thanks, Bartley!), and it's about ready for silt fence. Still needs some root pruning. God forbid we harm trees that WE own.
Wednesday, June 28, 2017
Tomorrow, trees start coming down
So trees start coming down tomorrow...finally! I took some pre-tree removal pictures. See below. Hopefully in another week, I'll have something to compare against.
Here is a map for reference:
A couple from across the street, looking at the driveway entrance:
Point 1:
Point 2:
Point 3:
Point 4:
Point 5:
Point 6:
Point 7:
Point 8:
Point 9:
Point 10:
Point 11:
Here is a map for reference:
A couple from across the street, looking at the driveway entrance:
Point 1:
Point 2:
Point 3:
Point 4:
Point 5:
Point 6:
Point 7:
Point 8:
Point 9:
Point 10:
Point 11:
Tuesday, June 6, 2017
Never ending
The list of requirements for building a house is never ending. I found out today that I need a green card. When the inspector asked me if I had a green card, I told him I'm a US citizen. Apparently, I need a different green card. I have to take a class on erosion and sediment control since I'm the responsible person for the project. It's free, at least, but one more thing to add to the S.T.D. list.
Just imagine, in some locations within the US, and not that far from where I'm sitting, all it takes is a sketch to get a building permit. Why couldn't we have moved THERE?
Sunday, May 28, 2017
Example of structural details
Here is an example of the structural details I've been working on. This is just for the balcony off the back of the garage. I specify the hardware required, as well as the quantity and type of fastener (ie, nails, bolts, screws).
Tuesday, May 23, 2017
Big day #1
Today is Big Day #1...the day we received three approved site permits.
1) Sediment Control/Stormwater Management (SC/SWM)
2) Right of Way for driveway
3) Right of Way for sewer line (for the subdivision)
Now we get to have a pre-construction meeting and then can start clearing land. Woo hoo!
1) Sediment Control/Stormwater Management (SC/SWM)
2) Right of Way for driveway
3) Right of Way for sewer line (for the subdivision)
Now we get to have a pre-construction meeting and then can start clearing land. Woo hoo!
Sunday, January 8, 2017
A reminder from Mother Nature
This morning it was 14 F outside. It is chilly in the downstairs of the old house we rent, and quite warmer in the upstairs bedrooms. Evidence of significant stack effect in this rental house.
I went and checked my PHPP analysis for the new house...I used 12 F as the minimum winter temperature to design heating for.
I consider this a reminder from Mother Nature as I look for cost cutting measures in the house we are going to build. Her reminder: don't skimp on the insulation or the air sealing, no matter what anybody tells you.
I went and checked my PHPP analysis for the new house...I used 12 F as the minimum winter temperature to design heating for.
I consider this a reminder from Mother Nature as I look for cost cutting measures in the house we are going to build. Her reminder: don't skimp on the insulation or the air sealing, no matter what anybody tells you.
Wednesday, November 2, 2016
Rainwater Harvesting and other plumbing considerations
For awhile, I've been interested in the idea of harvesting rainwater from the roof to use for potable and non-potable water needs in the house. I first heard of it in Bellingham, WA, at a water conservation expo, and the idea has fascinated me ever since.
Here in Montgomery County, MD, they are pretty big on stormwater management (SWM). The soil on our lot (indeed, in most of Poolesville) does not infiltrate very well, if at all, so most SWM concepts are out the window. However, rainwater harvesting is one of the options the County allows for meeting SWM requirements.
My current plan is to use six 1,700 gallon tanks buried in the ground near the house to collect the rainwater. They look like the picture below. The green thing on top is a childproof manway.
We have town water available, but the quality, frankly, isn't all that great (it's extremely hard) and water main breaks are a frequent occurrence. I would still connect the town water to our system, downstream of purification devices. I drew up a schematic, below. Hopefully you can click this link here to see it full size.
Aside from the tanks and getting the rainwater to the tanks, it's not much different than having a well. We'll see if the County goes for the non-potable users...a read of WSSC standards indicates only toilet flushing would be eligible for that; lawn sprinklers and outside hose bibs have to be potable, which is ridiculous in my view. If that's the case, then we'll just make it all potable and simplify it.
I'm also going to put in hot water recirculation. There will be 3 main trunk lines for hot water serving the 3 main areas that have bathrooms and the kitchen. Each trunk line will be part of a loop that comes back to the water heater where there will be a pump. Each loop will have a motorized valve on the return leg. I'll put motion sensors in each bathroom and in the kitchen, so any time it detects motion and the temperature in the loop is below X degrees F, the valve on that loop's return leg opens and the pump kicks on for a short time period (like 20 seconds or so). If I size the pump and trunk lines correctly, it should only take 7 - 10 seconds for the cooled water in the trunk line to get flushed with hot water.
Here in Montgomery County, MD, they are pretty big on stormwater management (SWM). The soil on our lot (indeed, in most of Poolesville) does not infiltrate very well, if at all, so most SWM concepts are out the window. However, rainwater harvesting is one of the options the County allows for meeting SWM requirements.
My current plan is to use six 1,700 gallon tanks buried in the ground near the house to collect the rainwater. They look like the picture below. The green thing on top is a childproof manway.
Aside from the tanks and getting the rainwater to the tanks, it's not much different than having a well. We'll see if the County goes for the non-potable users...a read of WSSC standards indicates only toilet flushing would be eligible for that; lawn sprinklers and outside hose bibs have to be potable, which is ridiculous in my view. If that's the case, then we'll just make it all potable and simplify it.
I'm also going to put in hot water recirculation. There will be 3 main trunk lines for hot water serving the 3 main areas that have bathrooms and the kitchen. Each trunk line will be part of a loop that comes back to the water heater where there will be a pump. Each loop will have a motorized valve on the return leg. I'll put motion sensors in each bathroom and in the kitchen, so any time it detects motion and the temperature in the loop is below X degrees F, the valve on that loop's return leg opens and the pump kicks on for a short time period (like 20 seconds or so). If I size the pump and trunk lines correctly, it should only take 7 - 10 seconds for the cooled water in the trunk line to get flushed with hot water.
Sunday, October 30, 2016
Shoe spice racks
One thing we've wanted in a house for a very long time is a kick ass mudroom. SWMBO is also rightfully big on shoe storage. We always end up with shoes everywhere in the entryway. Partly because we've never had a mudroom, partly because we (including I, I will admit) have a lot of shoes, and definitely because we've never had proper shoe storage.
Our intent is to do the same thing, but for shoes and in the mudroom. I think we have the space to put four of these things in the mudroom, floor to ceiling, one for each of us. No excuses for leaving shoes strewn about. Here's a picture of one somebody implemented.
Enter the shoe spice rack.
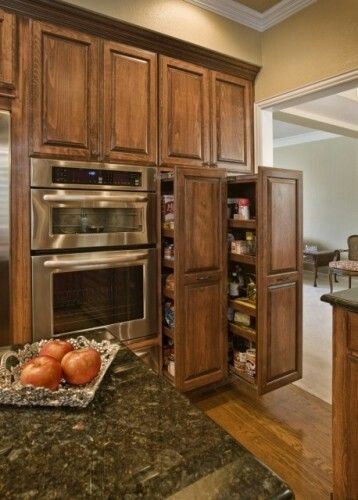
If you've ever perused pictures on kitchen design, you've probably seen these pull out pantry deals that are tall, narrow cabinets that slide out and have shelves for spice or food storage. See an example below.
Our intent is to do the same thing, but for shoes and in the mudroom. I think we have the space to put four of these things in the mudroom, floor to ceiling, one for each of us. No excuses for leaving shoes strewn about. Here's a picture of one somebody implemented.
Wednesday, September 28, 2016
Getting started
So you may have gotten an invite from Google to this blog. I'm just fiddling with the idea of documenting the potential construction of our house, but wanted to keep it private and thought I'd try that function. I didn't realize Google was going to send email invites.
Just to give you something to look at, here is a front, rear, and frame pic of the house design we are going for. There is quite the possibility that we won't end up with this house, but it's where we're starting. Might as well start with what we want and cut back from there, right?
So we're going to try to build a timber frame house. The frame you see in the upper right would be completely exposed on the inside. Big timbers, 8 - 10" thick. There are some slight modifications that the architect is working on; for one thing, it's the Eckert Highfill House, not just Highfill. But this is pretty close to how the design should end up.
Just to give you something to look at, here is a front, rear, and frame pic of the house design we are going for. There is quite the possibility that we won't end up with this house, but it's where we're starting. Might as well start with what we want and cut back from there, right?
So we're going to try to build a timber frame house. The frame you see in the upper right would be completely exposed on the inside. Big timbers, 8 - 10" thick. There are some slight modifications that the architect is working on; for one thing, it's the Eckert Highfill House, not just Highfill. But this is pretty close to how the design should end up.
Subscribe to:
Posts (Atom)